Table and Mirror Frame For Bar
Viewer Project
-
By Bill from Ohio
Added on April 6, 2010
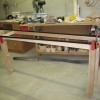
Here’s a little background on my project. My friend, Karen, had a friend of hers designed a table and mirror to install behind the built-in bar in her basement. Based on her design, I came up with the dimensions and prepared a cut list.
I had to match the finish to the rest of the paneling and the bar in the basement. I tried several types of wood but the best match was with birch. The top ended up being 85″ long and 16.25″ wide and a full 1.5″ thick. After gluing up the top, I ran it through my drum sander to flatten and achieve final thickness. Next came the legs, 3″ square 36″ long. I had to then engineer how to fit the two shelves around the legs. I remembered how to utilize sticks to wrap around the legs and then using a flush trim bit cut a pattern out of 1/2″ plywood. After cutting the corners of my pattern square with a flush cut saw, I tried a fit around the legs…perfect tight fit. I then set the legs on the top to determine their placement. After that, I transferred marks to 3/4″ birch plywood and using the pattern, I used a jig-saw and rough cut the leg openings. I left the plywood long on both ends to hold the legs in place while I measured for the aprons. The plan called for 1.5″ thick shelves. After I cut the shelves to length and cutting the 45 degree angle at the left end, I used 3/4″ thick stock and cut a rabbet in which the plywood shelves could rest. I wrapped the plywood giving it the appearance of being 1.5″ thick and it also gave the shelves a lot of rigidity. Next came cutting the aprons which I would attach with loose tenons cut with my Festool Domino. I also had to fit in a piece of wood between the bottom of the aprons at the right side for the chrome wire glass holders.
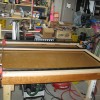
With the frame, I needed to fit a 60″ x 30″ mirror in the opening and below the mirror was a 60″ x 12″ section of 1″x2″ colored glass tile. I attached a 1/4″ piece of cement board on a 1/2″ piece of plywood, applied the tile and then grouted with sand free grout. After seeing how thick the tile was, I had to change plans and use 1.25″ thick stock for the frame. I cut a 1″ x 1/2″ deep rabbet on the back of the frame to fit 1/2″ plywood which I attached with 1″ screws. I cut a double rabbet on the bottom piece of the frame for the tile so I could snug up the frame piece to the tile. All connections were reinforced with 8mm dominos. That sure makes it easy. Next step was a dry fit to ensure that everything fit properly. Then I glued up the frame but due to the size of the table, I decided to assemble the table in Karen’s basement. I never would have gotten the assembled table up my basement steps. After staining everything to match a sample that I made early in the process to match the existing stain in Karen’s basement, I sealed with a coat of shellac and then 3 coats of General Finishes semi-gloss top coat. It was a fun and challenging project to build and the best thing is that Karen loves it.
Advertisers


