Nut Cracker


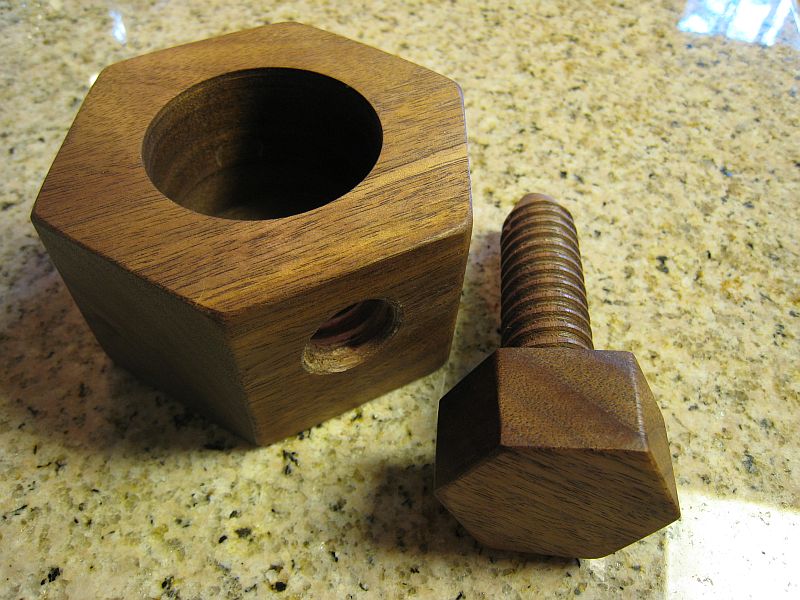
This week’s project comes from Mattias. It’s an amazingly simple, yet clever, nut-cracking device. Here’s what Mattias had to say:

This is a replica of a nut cracker that I remember from when I was a kid. It’s made out of walnut from a tree in my wife’s grandmother’s front yard, and I’ve made a whole bunch of them for family and friends. You place the nut in the hole and tighten the smaller bolt, until the nut cracks. This is a great nut cracker design, really, because you have lots more control, and don’t get pieces of shell flying across the room, or crushed fingers.

It’s a pretty handy Christmas present because it’s relatively quick to make, small, and nobody has usually seen anything like it. Then of course you have the visual pun of it being shaped like a nut. The finish is Tung Oil, three coats. The threads are cut using a tool from Highland Hardware, size 3/4″. The center hole is 1 3/8″.

Nut Cracker 1 Nut Cracker 2


15 Responses to “Nut Cracker”

  1. Roger (rjack) says:

    Pretty cool! How do you create the threads?

  2. Roger (rjack) says:

    Doh! Guess it helps if I read the text.

  3. William says:

    “Doh! Guess it helps if I read the text.”

    Or Nicole will gut you like a fish.

  4. Mattias in Durham, NC says:

    Sweet! I’m on the Wood Whisperer!

    Roger: Right, it’s in the text. It’s funny, I wonder how I can put wooden threads into every project now. Anyway, I hope Nicole didn’t get you yet.

  5. Cutter Head says:

    not bad, not bad at all,
    and your right, i’ve never seem something like that before.
    I only hope that the walnuts don’t damage the finish/wood when it is used.

  6. Tomcat1066 says:

    I like it! Interesting piece with a unique flavor. I especially like using walnut to make a nut shaped nutcracker. Definitely something you don’t see every day!

  7. Ian Webster says:

    Mattias,

    Did you use the Beall threader (used with a router), or the hand turned threader?

    It looks as if the Beall is fairly easy with no wood pre-treatment needed. Any thoughts?

    –Ian

  8. Mattias in Durham, NC says:

    Ian,
    I’m using the hand threader (think of it as cordless!). The tap works just fine with no pre-treatment at all. The die cutter needed a bit of sharpening, and now it cuts extremely cleanly. I just wipe the dowel with Tung Oil before cutting the threads.

    I don’t use the router option because my current router’s depth setting wouldn’t be precise enough. The hand turning is much quieter, too. The router option might be better in difficult woods, but then how would the threads hold up anyway?

    I’m using this one:
    http://www.highlandwoodworking.....rodID=3055

  9. Brad H says:

    Great project.

    I’m having trouble telling from the picture if the hole goes all the way thru or if it makes a bowl.

    Also, scale is hard to tell. I know you put demensions in the post, but maybe for future, when taking great pictures like this, add something for scale reference (like the old quarter or dollar bill route – or better yet in this case, a regular sized walnut.

    Thanks for posting it.

  10. Mattias in Durham, NC says:

    Brad,
    You’re welcome, and I’m just happy if someone can be inspired to make some wood chips.

    Right. The nut cracker is actually for the prehistoric bongo nut which is 2 feet in diameter, and I know it’s a little hard to tell in the photos, but the bolt part is powered by a modified Harley-Davidson engine. Also, it can be hard to find nuts. Alternatively you can use it to mix concrete. (Just kidding.)

    The hole does not go through. The main “nut” is about 1 3/4″ tall, and 3″ across the flat parts (side to side). The diameter of the hole is 1 3/4″ (the diameter listed above in the posting is incorrect – I just re-measured! Marc – maybe you can update the post if you read this?). There is >1/2″ of wood around the perimeter of the hole, and I try to leave <1/4″ at the bottom when drilling out the hole. A regular walnut I would say fills about 75% of the hole.

    The total length of the threaded bolt with the knob is about 3 1/4″; its head is 3/4″ tall and 1 1/2″ across the flat parts. The threaded rod is fitted into a 1/2″ hole, and I just freehand trim the end down to fit that hole on the bandsaw, and set it with 5 minute epoxy. With epoxy, rough is good. I turn the tip of the bolt to a 5/16″ point on the belt sander because otherwise it will splinter badly as soon as you crack one nut. You can kind of see that in the 2nd photo.

    Thanks for the tip about scale – I should have added something, but didn’t because I figured I wanted to take a clean photo.

    It’s really a fun project, maybe because it’s so small. Maybe also because it doesn’t have to be super precise. I hand sand the parts, and round over edges by hand. This accounts for about half the time it takes to make them. For a different, more nut-like look, you might round over the corners more, or even chuck it in the lathe. Each one is a little different. Don’t forget to sign them!

    Cutter Head,
    Sorry, I didn’t see your comment before. The Tung Oil finish holds up pretty well. The wood fibers are slightly crushed in places on the inside of the hole after using the nut cracker for a while, but that’s to be expected. It doesn’t look bad, and the outside is unaffected.

  11. btonze127 says:

    hey, i am trying to construct this as a project for my eighth grade technology students, it looks like a perfect project! Could you possible send me an email with more info, Ive taken woodworking classes at my college but I have never done any threading. Please help me.

  12. Michael in AZ says:

    Really cool way of remembering a tree.

  13. GaryCN says:

    I’m working on this for stocking stuffers this year.
    View my progress and suggestions at lumberjocks.
    http://lumberjocks.com/GaryCN/blog/12026
    I thank Mattias because this is unique and a somewhat
    easy project after 2 prototypes I can now probably
    cut the time in half. The cost of the threader is not
    that bad if you make 6+ units. I have about $50 in wood
    and $50 for the Manual Wood Threader. I could easily make
    12 gifts for under $10 each.

  14. Jim Harvey says:

    Why did you orient the grain of the nut part horizontally? Wouldn’t it have been stronger if the grain ran parallel to the screw?

  15. GaryCN says:

    I can’t speak for the original one by Mattias but after I posted a photo of the prototype that I was working on at Lumberjocks the same point was made there. I attempted to drill as close to the end grain as I could after that. I had already cut out four parts for the large nut and was attempting to maximize the 8/4 walnut board. I plan to make a few more and I’ll make sure that I have end grain on a flat area. Now on the ones I have almost done the end grain is closer to a point. When I was working on the first few that was one thing that I had not considered. Thanks for the comment.

Leave a Reply


Stay Connected

Search

Coming Up

Get Woodworking Week

2012,02,05,0,0,0

Box Week

2012,02,13,0,0,0

Video: Tapping Threads

2012,02,22,0,0,0


The Guild

What is the Guild?

The Wood Whisperer Guild is a unique and interactive online woodworking school. We invite you to join   our premium membership and build 2 projects over the course of a year with Marc and your fellow guild members.

Visit the guild page
for full details.

What's New

Coming Up

Video - The Dovetail

2012,02,10,0,0,0


Woodtalk Online


    Support our Advertisers


    Local Market


    The Guild

    An interactive online woodworking school. Learn how to build furniture at your pace with the aid of incredibly detailed videos. Members recieve numerous other benefits including discounts and access to special live events.

    WoodTalk Online

    Connect with your fellow woodworkers in a friendly environment. Learn something new or simply share your knowledge. Design, Share, Build.

    Stores

    Support us by shopping in our store. DVD’s, t-shirts, hats, coffee mugs, project plans, and more!

    Behind the Scenes

    Education and Entertainment for the modern woodworker.

    Contact

    Education and Entertainment for the modern woodworker.


    (n) Copyright © 2010 The Wood Whisperer. All rights reserved.
    Designed and Developed by Underscorefunk Design